
 Time to Read: ~3 min
A Sewing Party
We discovered these running headbands called Sweaty Bands in 2012 when my sister did the Boston Marathon. She went to the Expo and bought one for herself while my parents picked up one for Elizabeth and for me. At $15-$19 each, they are not something you'll accumulate too many of. My silver one disappeared a few months later, and two years went by before I considered replacing it. Likely tired of hearing me lament its absence, Sarah sent me one as a present this spring.
We were on a family vacation this summer and came across the same type of product in a local running store. Called, Bic bands, the price point was a little lower. Still, there were so many colors to choose from and now that I had a neutral colored band, I decided that I didn't need to buy another.
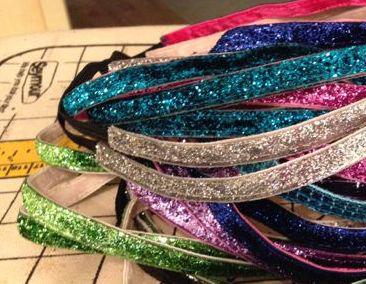
This fall, Elizabeth started her 2nd year on the cross country team. We decided it would be fun to do a mother-daughter sewing project and make her team headbands in school colors. Pretty soon those were made, and then we made them for my friends, and later made more for her dance team!
It is fun and even a little addictive!
Materials
- Ribbon We used 3/8" sparkly and plain ribbon
- Interfacing The interfacing should be a little thinner than your ribbon. We used 1/4"
- Velvet This should be the same thickness as the ribbon. In our case 3/8"
- Black elastic 1/4" or thinner. If you use very thin elastic, you will need two pieces.
- Thread Match the ribbon for the spool and the elastic for the bobbin or use clear thread.
- Candle or lighter
- Iron and ironing board
- Sewing machine, scissors, cutting mat, measuring guide
Making the Headbands

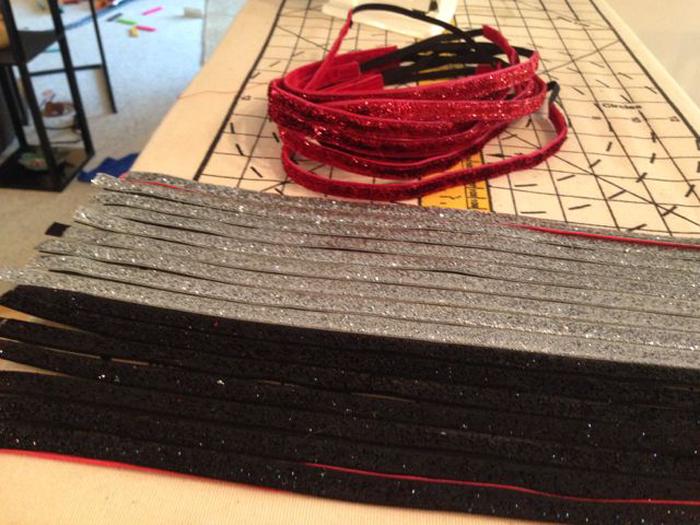
Ribbons all cut
- Measure and cut the ribbon, interfacing and velvet. The sizing for a standard adult headband is 20" - 20.5" while kids' sizing is 18" - 19". If you are custom making them for a particular person's head, you can use the rule of thumb to measure the head where the headband will fall and then subtract an inch or two. Generally we cut the ribbon and velvet 15" long and then the elastic is 5"-6" long. We cut 14" long pieces of interfacing.
- Turn on your iron and set it to the wool setting (or follow the interfacing instructions). Lay the sparkly band sparkle side down on the ironing board, followed by the interfacing (leave 1/2 inch free at each end) and then the velvet with the velvet side facing up. Carefully iron until the ribbon and velvet are fused together. *This step is very important and can be tricky. You need patience to keep the interfacing from getting off kilter.
- Use a lighter or candle to singe the ends of the ribbons. This will keep them from fraying when you use the headbands. Take care that the ribbons don't fuse to each other. You'll be inserting elastic between them in step 5. Note: This is one place where our style is different from the bands on the market. They have the fabric turned up to avoid fraying, but we took this step away because it eliminates bulk and makes the bands just a little faster to make.
- Cut your elastic to size. I like to re-measure my band at this point and check that we still have 15 inches. Then, cut approximately 6" of elastic for your band.
- Prepare your sewing machine with the thread. The bands look nicer if you match the thread colors with the ribbons. You can use clear thread, but we found that it was easier to sew with colored thread. Sew on the edge of the band down to the end, and then insert the elastic between the ribbon where the interfacing ends. You'll have about 1/2" of elastic per side. Turn and sew a couple of times across the elastic to secure it well, and then continue sewing on the other side of the ribbon. When you get to the end of the other side, you can put the elastic into that opening and finish the sewing. Make sure to sew several times across to secure this like you did on the other side.
Wear and Enjoy
Likely after you start this project you'll want to have a big collection!! We went from having a couple of colors to a full rainbow. My daughter now wears them to school, while running and to dance every day. It is a great mother-daughter activity, and a fun gift idea for your active friends. Once you master the glittery style, branch out to other types of ribbon. We now have some that are sequined and some that are perfect for more fancy occasions. These are tougher to iron and sew, so make sure to fully master the other ones first.